Q1: Hi, Emil. Could you introduce yourself to everyone?
I’m an amateur astronomer and the author of lucky imaging software AutoStakkert. I have a background in artificial intelligence and human-machine communication, and I like to make software when that means it makes my life easier. I’m lazy. I used to be very active in imaging the planets myself, but for the past couple of years that has decreased a bit. This is related to the low altitude of the planets at my observing site, but also to the fact that I live quite far away from where I do my observations. I’m sure that in the future I’ll be more active again, but in the meantime, I have other hobbies that keep me distracted as well.
Q2: When did you start liking astronomy? And when did you have your first telescope? What’s the feeling in first observing?
I always had a bit of an interest in astronomy, and I remember when I was maybe 12 that I was very impressed with seeing craters on the Moon through a small red telescope. This telescope quickly broke, and I got distracted by other things. It was only in 2006 during my studies that things really started for me when I saw an image of Saturn that a friend of mine made using a small 11cm Newton telescope and a webcam. The quality of the image was not that good, but the fact that you could see the rings and belts in an image that you can make yourself immediately made me want to do that as well.
I bought a 7cm Newton telescope that was of such low quality that I very quickly replaced it with a second hand 15cm Newton on an EQ3 platform. I also bought a webcam that had a Sony ICX098 CCD sensor, and started imaging. On my very first image of Jupiter you could not see much at all, and my first Saturn images were rather poor too. But I liked it, and after some more attempts, and replacing the 15cm Newton with a very good quality 25cm Meade Starfinder that I still have, things started improving and I was having even more fun.
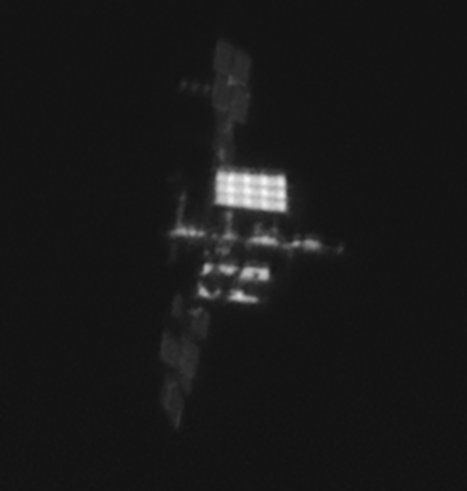
The International Space Station imaged through a 10” F/4.5 Meade Starfinder telescope with modified DMK21 that had an ICX618ALA sensor installed. I manually guided the telescope, trying to keep the ISS in the field of view of the tiny sensor by keeping it in the center of my guide scope. In about 1% of the frames I actually succeeded, but this gave me enough frames to make a nice animation and even do some image stacking to improve the quality. It’s much easier if you have a mount that can track the ISS (and/or have a camera with a bigger sensor!)
I do like the versatility of the hobby and the challenges that they bring. When you have a pretty good telescope, and especially a versatile one as a Newton or Dobson on EQ platform, you can do many different things. You are not limited to imaging the planets, but can also for example dabble in deepsky imaging, Solar imaging (e.g., with a light-blocking foil filter) and you could even image the ISS if it happens to fly above your head. I think that by trying different things, you learn to be versatile and get a good understanding of the common difficulties, leading to better overall results. But it’s also just fun that you can try different aspects of the hobby with essentially the same equipment.

Mercury during the Solar transit on May 9 2016 imaged with a 10” Meade Starfinder, Baader astrosolar foil and an ASI camera with a green filter.
I never did many visual observations, but I do remember looking at Saturn through my 25cm telescope on one of the very first nights of good seeing, and having a very surreal feeling of ‘this looks so cool, almost fake’. Saturn is the only planet that does this to me.
Q3: When did you start to do astrophotography? And what equipment did you use? can you show us some images?
Right from the start I was only really interested in astrophotography, so pretty much the first thing I did with my telescope was to place a webcam and start recording. The fact that you can capture things (with a bit of practice) in much greater detail than you can ever see visually is what makes astrophotography so interesting.


My very first Jupiter and Saturn attempts – very low at the horizon – imaged with a Philips webcam through a poorly collimated (and focused) 13cm telescope.
Of course, in the beginning I wasn’t very good at all. Astrophotography is challenging, it can go wrong in many ways. You can only make good pictures if everything is done correctly; the collimation, focus, camera settings, post-processing, you need to have all of these under control. I like this kind of challenge, trying to get the maximum out of your equipment.
After switching to a bigger and much better quality telescope (Meade Starfinder F/4.5 10”), things started to improve.
And even then of course you can only do as well as the seeing will allow you to do.


After many years of experience, and switching to a bigger 16” Dobson telescope (and using better camera’s!) the images improved more.
Q4:We know you are author of AS!2 and AS!3,can you tell us your story behind the software? when did you have the idea and what is purpose behind it?
I first got the idea during the Mars opposition in December 2009. A few nights in a row I ended up with about 100 recordings of Mars imaged in different wavelengths. I knew then already that to maximize your chances of getting a good image, especially in not so good seeing locations, is to keep on recording for as long as you can. There are often a few moments during the night that the seeing is a little bit better. If you were not recording at those times, you won’t get the best possible image.
So to make the best possible single image, I had to process all those hundreds of videos. With the software at that time (Registax) that meant doing a lot of manual work, as the batch processing functionality in there didn’t work very well. I wanted something that could do this processing automatically. I could then quickly scan through the resulting image stacks, and perhaps put a bit more effort in the videos that I really wanted.
In a week time I had written something from scratch that worked quite well on my Mars recordings; it could create image stacks from all the recordings very fast, and with a very good quality already. Of course, it wasn’t very advanced back then, but over the next few years it turned into much more generic software that works on many different types of recordings and under many different types of seeing conditions.
One of the first versions of AutoStakkert. It could do only one things – stack small planetary recordings using a single alignment area – but it was fast and allowed you to do batch processing.
After a few months, I released the software free for everyone to use, along with another tool I created to crop recordings before processing to speed things up. I always tried to keep the software as simple as possible though. Even though what it does behind the scenes is sometimes advanced, I don’t want the user to be bothered by many settings. Too many options often make it more difficult to get good results.
Even now I still work on the software, although I don’t spend as much time as I used to. I hope to release a new version later this year, but I need to find a week or so of time to work on it, and that is proving quite difficult.
Q5: When did you know about ZWO? And what’s the first ASI camera you have? Do you know Sam Wen? can you remember the story of you first contact with him?
I first had contact with Sam back in 2009 already when he was already building telescopes, so before AutoStakkert existed. He was showing me very nice images of Saturn, the Moon and Jupiter that he made from Beijing. He was asking me if there was an English translation of an extensive document in Dutch on webcam astrophotography that I had written during a summer holiday. He was also thinking about replacing the colour ccd of the Philips 900nc webcam with a much more sensitive monochrome version (ICX098BL), something I had done as well on a few of my webcams.
A few years later in 2012 he said he founded a company called ZWO and asked me if I wanted to test their ASI120MM camera for him. It had a very sensitive CMOS sensor, even more sensitive than the ICX618, which was the best sensor at that time for planetary imaging. So obviously I was very much interested in testing the camera. It indeed worked better than any existing camera, especially in visible light. Since then I’ve been testing several new products from ZWO, and the increase in performance of their cameras especially is always very exciting to see.
Q6: Which ASI camera is your favorite? And why do you choose it?
It depends on what I want to do. When I want to do a bit of (short exposure) deepsky imaging, the ASI1600MM-cool is probably my favorite. For planetary imaging I use the ASI290MM, as that has the most sensitive sensor. But I still like the ASI174MM a lot as well, and sometimes fall back to using this camera, especially for some of the brighter targets.
Q7: we know planetary imaging is your favorite, What setup do you use currently? Could you share some picture of your setup with us?

I’m currently using a Dobson 16” F/5 on an equatorial platform. You can save a lot of money by not using a Newton and an expensive mount. I also like the versatility of this telescope a lot. It’s very fast, allowing you to do (short exposure) deep sky imaging as well, and with a barlow and the right camera you can perfectly do planetary astrophotography too.
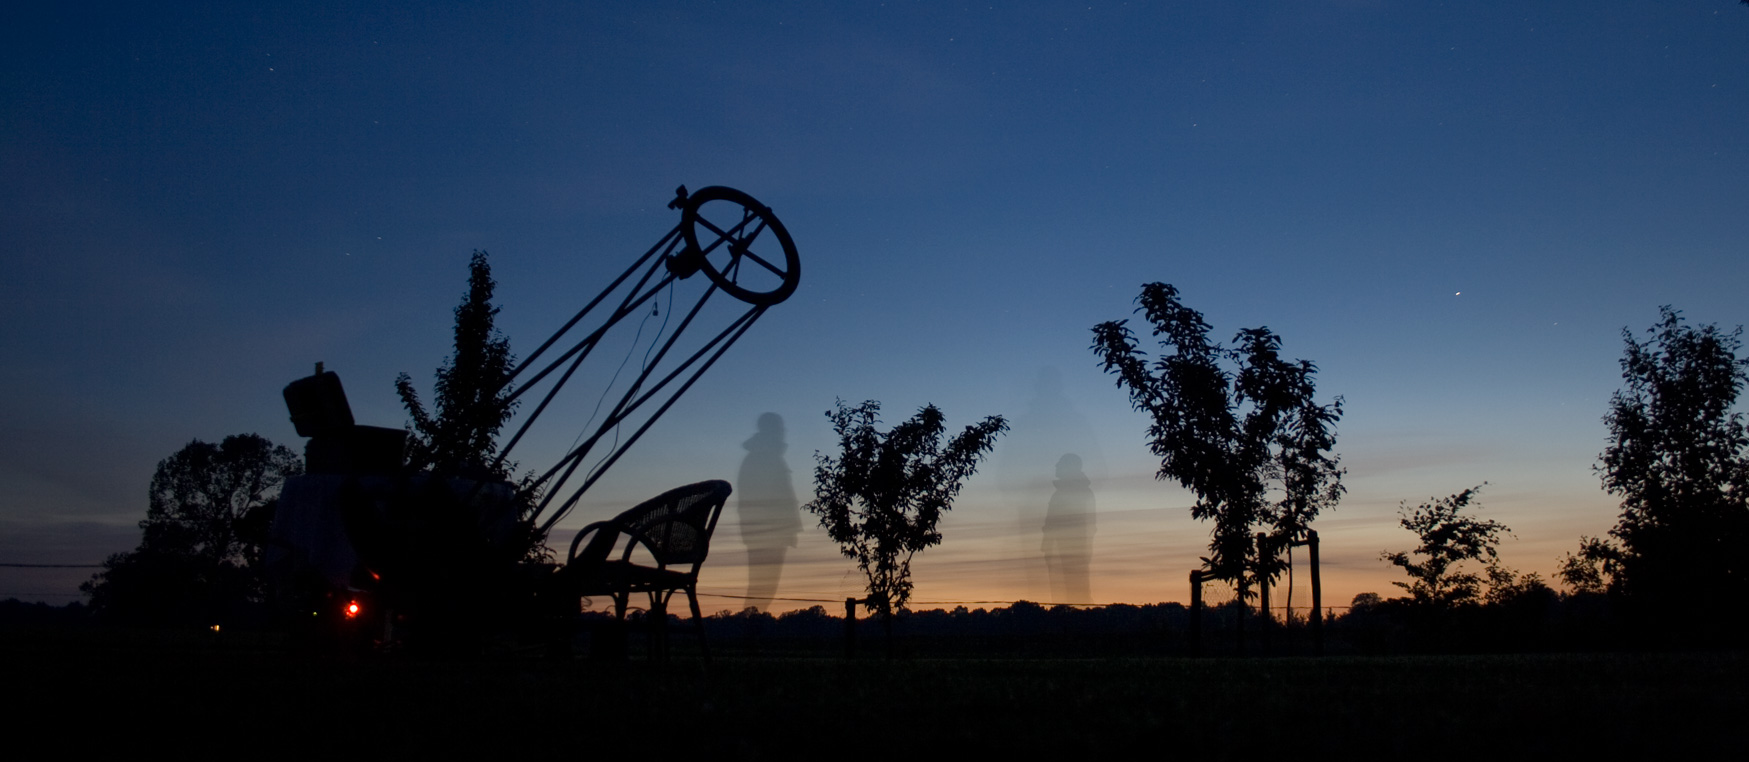
I have the telescope on a motorized equatorial platform to compensate for the earth rotation and allow tracking of the planets. It’s also quite good for short exposure deepsky imaging.
Q8: What is the hardest part in planetary imaging? And how to get rid of it?
The most difficult part for me right now is to find time, and I can’t seem to get rid of that unfortunately.
But in general, I would say that the seeing is the most challenging in planetary imaging. You can only make images as good as the seeing at your location allows you. I’m often jealous of observers near the equator with planets high up in the sky and generally having quite good seeing conditions. From the Netherlands it’s not easy; the planets are much lower generally (the past few years in particular have been very difficult with Jupiter only reaching 15 degrees altitude for example). You really have to image many nights to find a night of good seeing conditions.
Lucky imaging software allows you to fight the seeing a bit already, and in the future we might get some affordable Adaptive Optics solutions, but in the end the seeing will always be a limiting factor in our recordings. Perhaps moving to a better location is an option…
Q9: ADC is a very good accessory for planetary imaging. But it’s hard to calibrate it. Could you share us some skills of using ADC?
To be honest, I’m terrible at perfectly setting up the ADC. I usually fiddle around for a bit until I’m satisfied. You should really ask Damian Peach or Martin Lewis if you want to get it perfectly set up!
I usually copy what I did last time and what gave me good results for a target at a specific altitude. There is room to improve for me here!
Q10: We know you are also good at DSO lucky imaging, can you tell us more about the skill? can you show us some DSO images with this skill?
I started using this technique back in 2007-2008. Not because I wanted to, but because the mount I had (the original Meade Starfinder EQ 10”) just was not precise. It could track the planets OK, but there was a lot of drift, and the mount had a big period error too.

One of my first ‘OK’ deepsky images imaged in May 2008 with the 10” F/4.5 and several modified Philips webcams (one for color imaging, and one with a more sensitive ICX098BL black and white sensor). The total integration time was only 6 minutes.
Using short exposures was the only way to try and capture sharp frames. It was fun to see that you could capture ‘really’ sharp frames though, with stars that could almost fully fall inside one pixel, especially when the seeing was good. This made me realize that you might not need a very expensive mount, but you do need a very sensitive camera to catch enough light to make this work. You also need the software to stack all the images efficiently and accurately, and the skills to do the post-processing. It can be very tricky to calibrate the images; accurate darks are absolutely necessary, but I prefer to apply an artificial software field instead of ‘real’ ones.

This is my best result of M51 imaged in June 2015 at prime focus of the 16” F/5 Dobson imaged with an ASI174MM camera under good seeing conditions.
For me the technique comes down to using the longest possible exposure time that still ensures very sharp frames, while making sure you collect (and accurately measure) enough photons to image the galaxy/nebula/etc. in a good way. Good is very subjective of course. I know the limitations of short exposures, so I focus more on brighter objects, but as the cameras are getting better, it becomes easier to image fainter (parts of) objects as well.
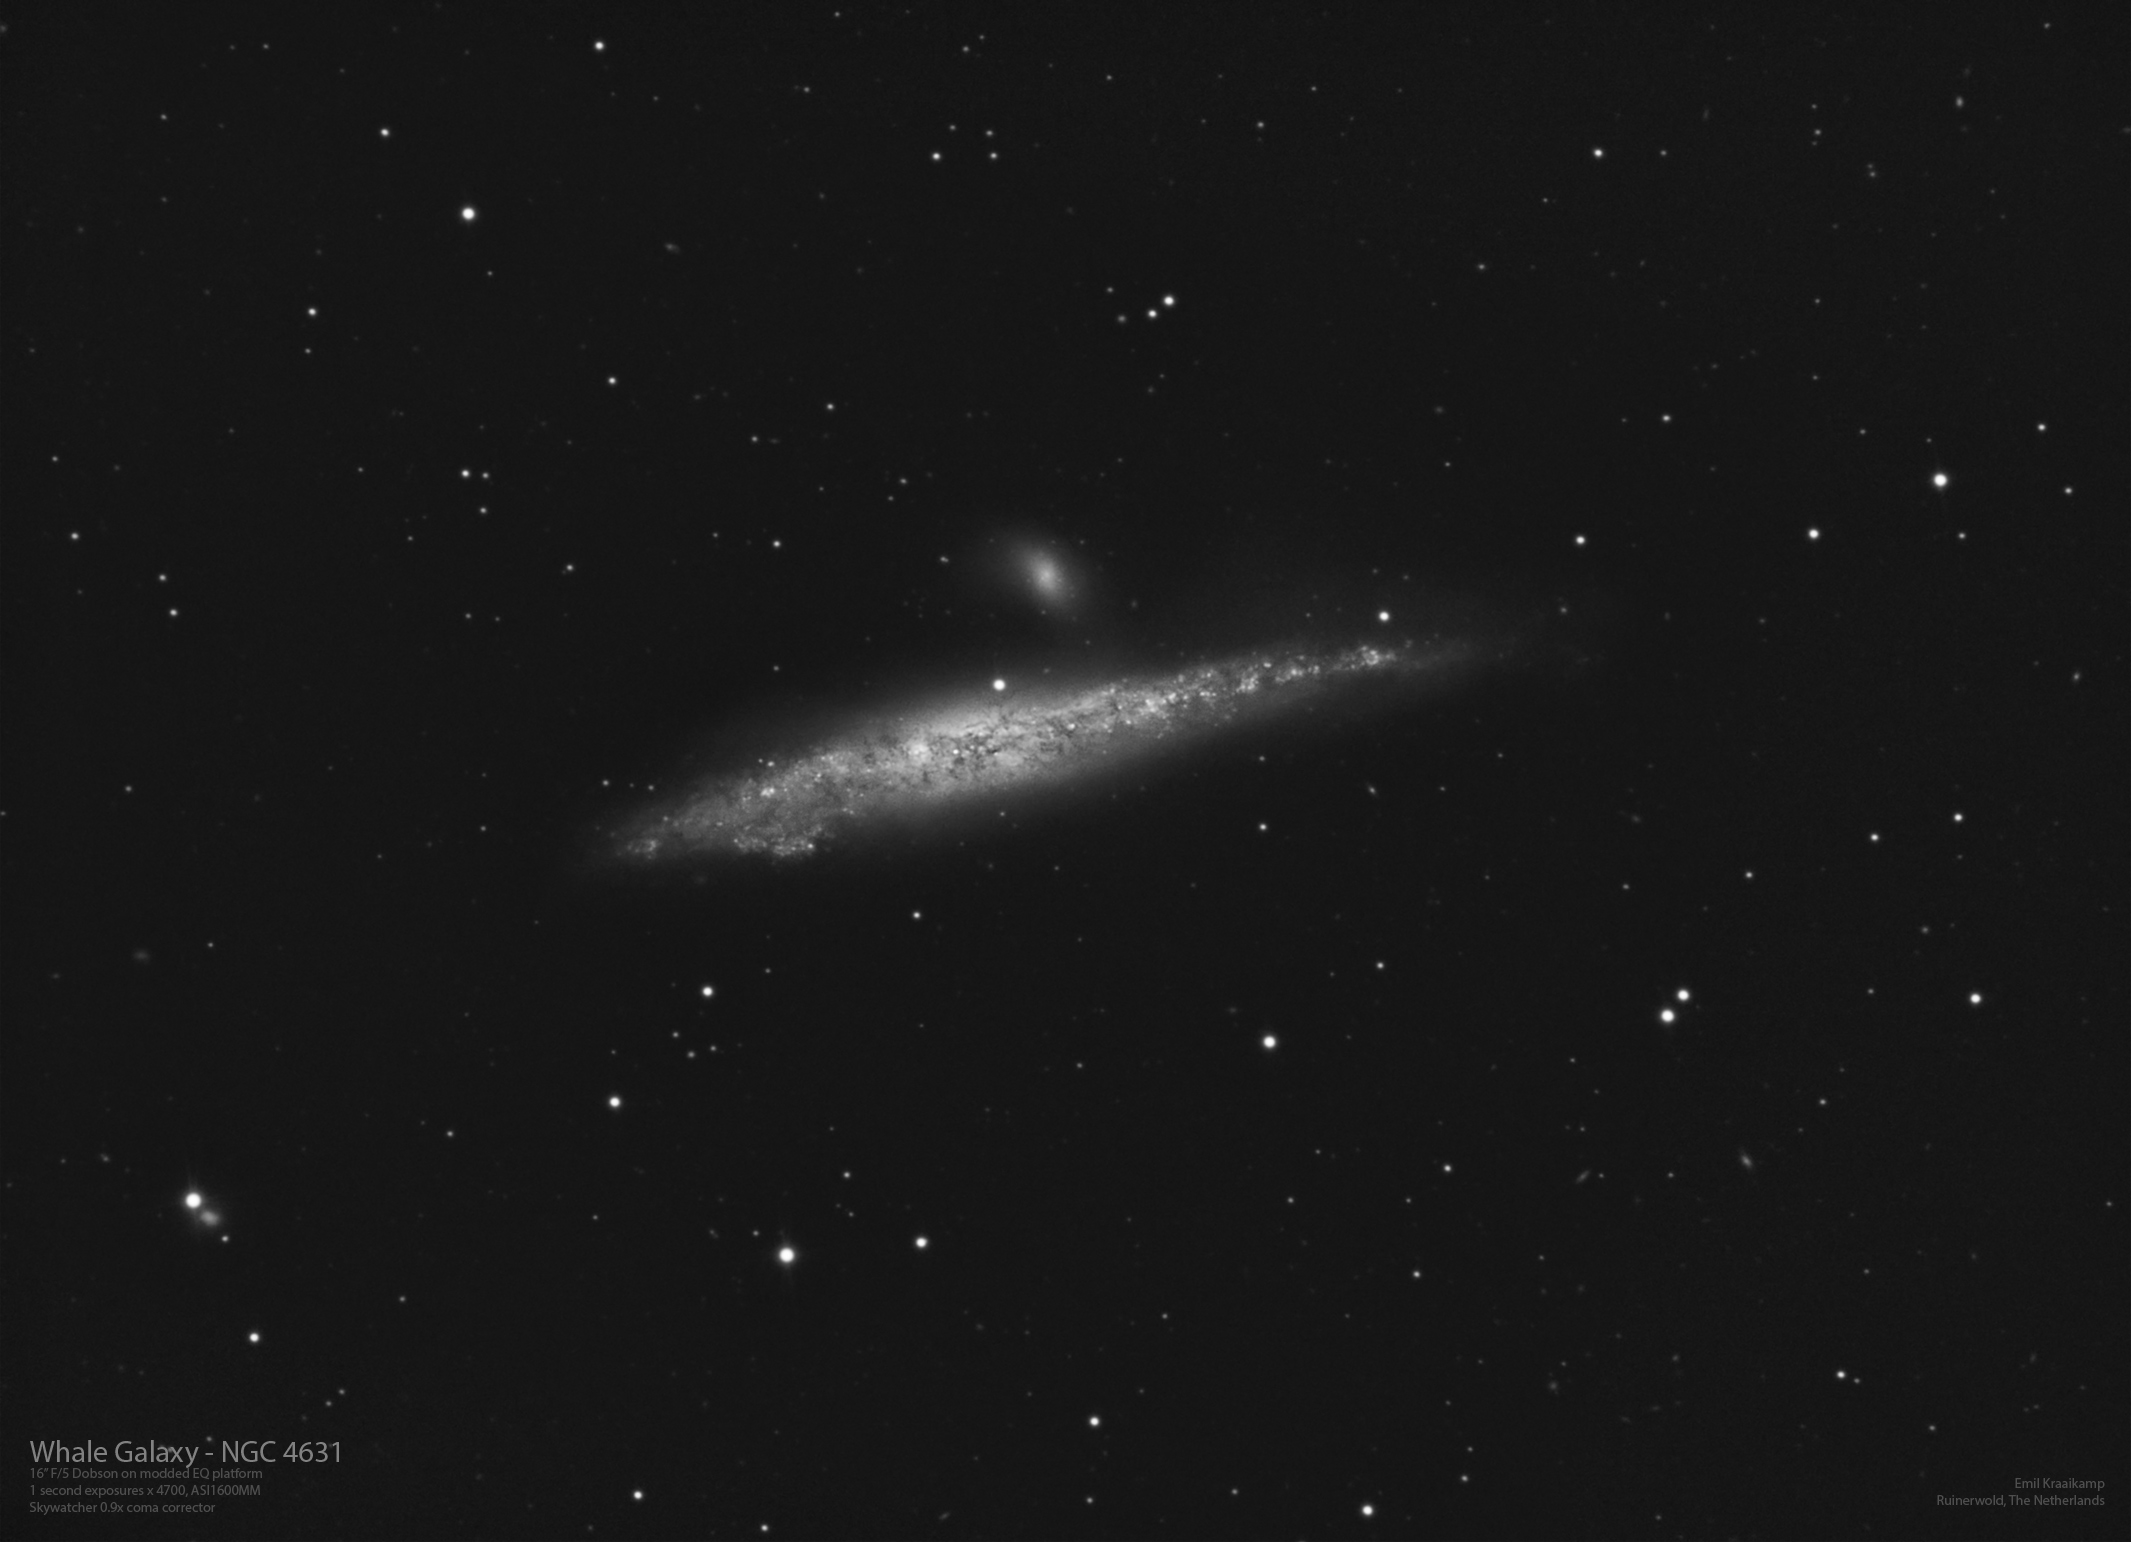
The Whale Galaxy in April 2018 imaged with the ASI1600MM-Cool and the 16” F/5 Dobson.
It is true that each frame is less distorted than longer exposed frames would have been (comparable to the lucky-imaging technique we apply with planetary imaging), but because the exposure time is still relatively high compared to planetary imaging (0.1-10s), this is not all due to seeing effects.
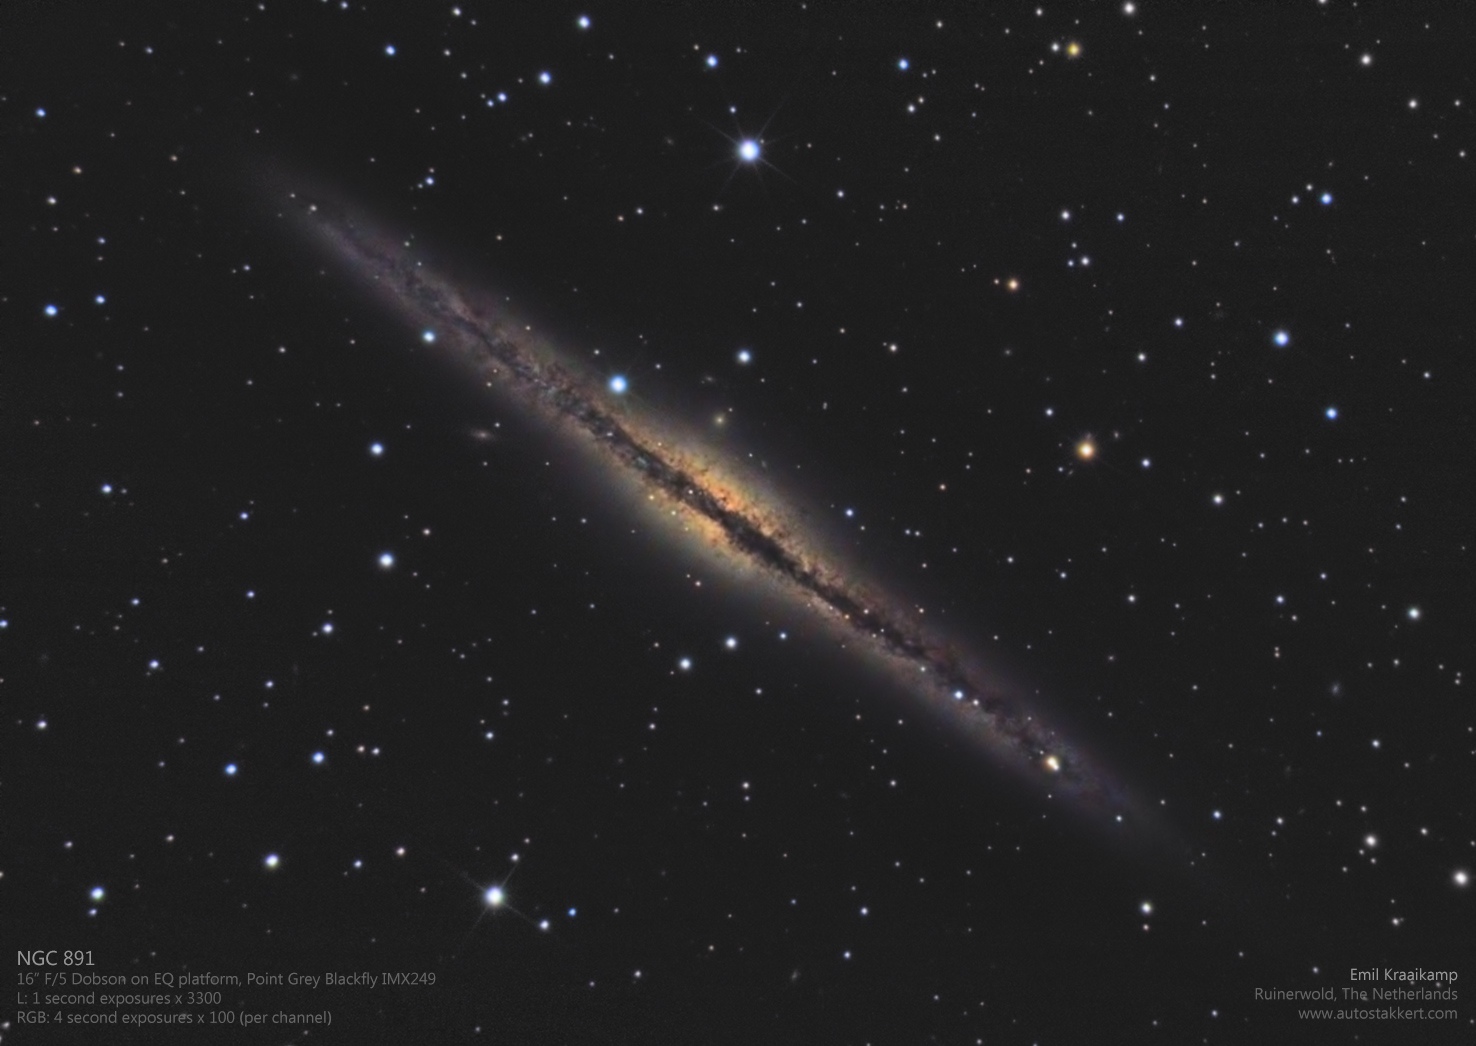
My best image of NGC891. It was taken with an IMX249 based camera from Point Grey in September 2015 during pretty good seeing conditions.
Q11:what is the most important parameter of a camera if you choose it to do DSO lucky imaging?
The two most important parameters of a camera are the quantum efficiency and the read noise. The quantum efficiency (QE) tells you how often a photon releases an electron in a light-sensitive area (pixel) of the sensor in the camera; a QE of 80% means that 8 out of 10 photons will release an electron that can possibly be read out by the camera, the 2 other photons are essentially lost. The higher the QE, the more photons your camera can see, the more sensitive your camera is.
But when it comes to reading out the charges in each pixel (the sum of all electrons released by the energy of the photons hitting the light-sensitive areas over some period of time), the read-noise is very important. This is essentially an uncertainty you get on each pixel of the camera, and for short exposures this almost acts like a threshold below which light cannot be accurate measured. If for example the read-noise is 7e-, and you have only captured one or two photons (that freed one or two electrons), then it becomes difficult to measure this faint signal. You would need to expose much longer to capture more photons, or average an awful lot of frames (many more than practical) to be know if what the camera measured was noise, or if it was actually signal coming from some stars in a faint outer region of a galaxy far far away.
If on the other hand the read-noise of the camera is very low, say about 0.4e-, you can accurately count each photon that is freeing an electron as it hits the camera, and the need for long exposures is completely gone. You just integrate many very short exposed images, and you’ll get as much signal as you would have gotten using just long exposures, but now all the frames are very sharp and much less affected by seeing! With camera’s that have around 1-e read noise, we are getting quite close to this photon counting capability, but they are not quite there yet.
Q12: We know you have a project in Pic du Midi and captured some very good data with the T1m scope, can you share some experience and images with us?
The T1m at Pic du Midi is a fantastic instrument for planetary imaging located in the Pyrenees in the south of France. Together with a group of other planetary astrophotographers we got a chance to observe the planets for a few days in 2017. using our own equipment attached to the 1 meter telescope. After the first night we saw that the ASI174MM was a very good match for this telescope, and we used this camera for most of the observations. Throughout the entire weekend we were very lucky with exceptional seeing conditions. Processing is still difficult though, and it takes a lot of effort to get the best results.
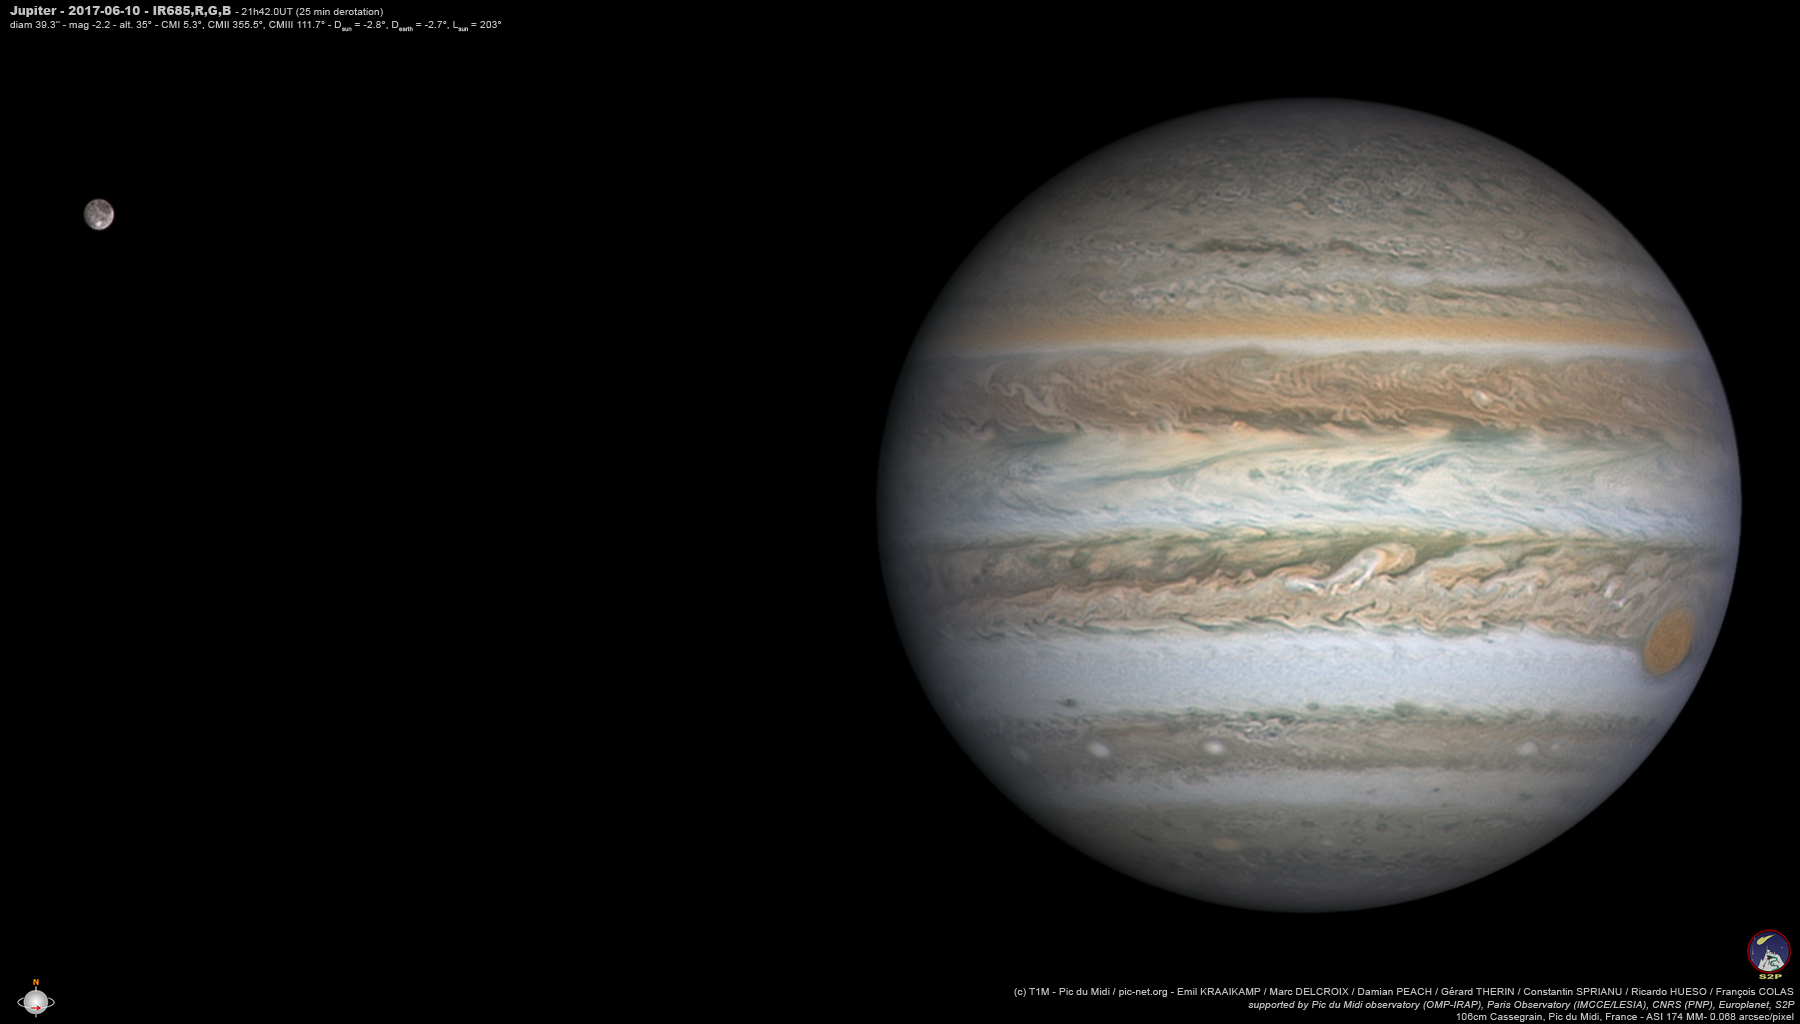
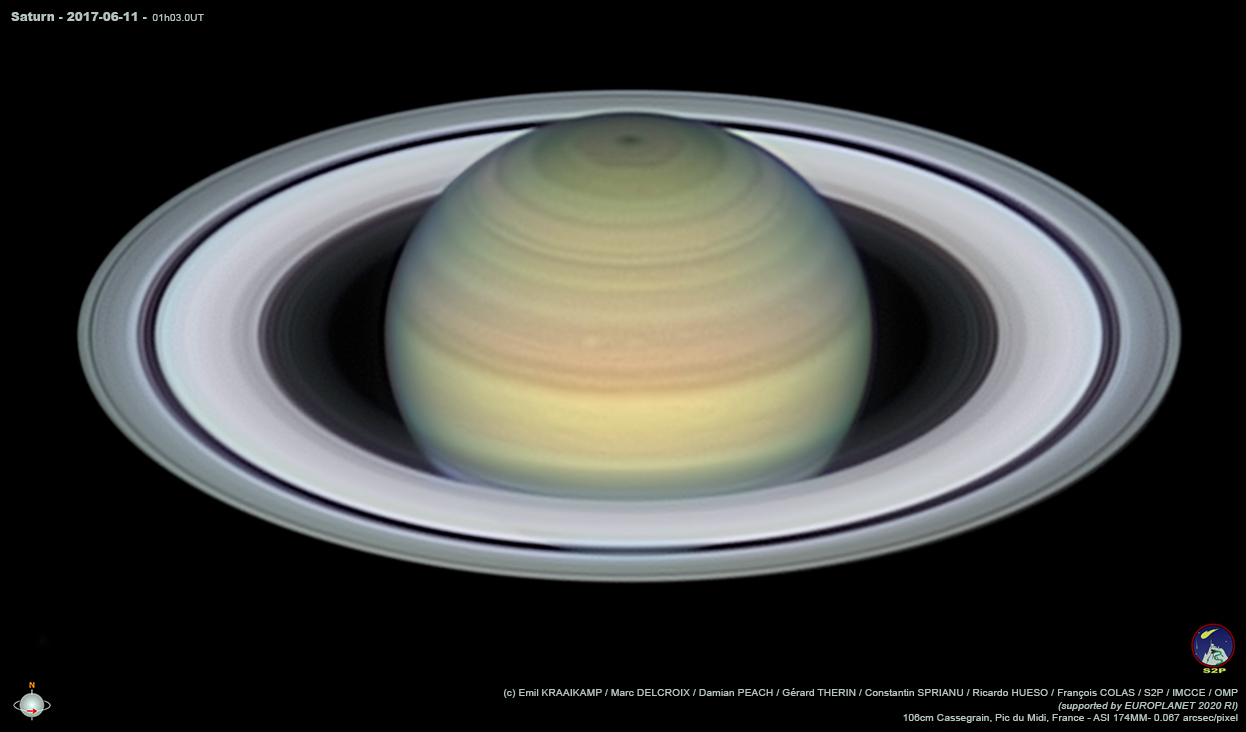
Jupiter and Ganymede on June 10 under very good seeing conditions imaged with the T1m telescope at Pic du Midi with an ASI174MM camera.
We were imaging sunset to sunrise (and after Venus) during probably the best imaging weekend any of us had experienced. It was an awesome experience.

Venus at sunrise the next morning. The seeing was still very good.
The seeing can be very good at this location, but as the planets are/were low in the sky, and as the telescope is very large, it is a big challenge to get good enough seeing to utilize the telescope to its full potential. Even in 2017 there was a lot of room for improvement, especially for the longer wavelengths (especially blue) as they are always more distorted by the seeing.
Saturn. We could see the Encke division on the screen while imaging.
We had another imaging run in 2018, but unfortunately the seeing was very poor on the first night, and technical issues prevented us from imaging again after that. It was still very nice to stay there a few days and enjoy the views and good food.
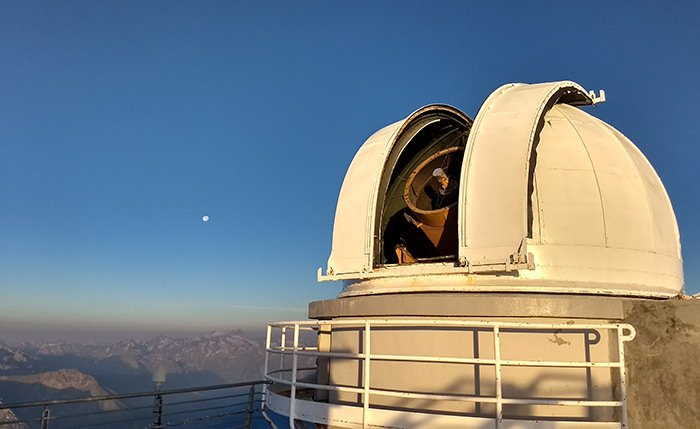
The T1m telescope at Pic du Midi while imaging Venus. In the background you can see the Moon over the Pyrenees.
I have no doubt that I’ll return there in the future for more imaging campaigns!
Q13: What’s your impression of ZWO?
ZWO is a very interesting company that has opened up possibilities for quite a lot of planetary and deepsky astrophotographers. I enjoy how ‘fast’ the company is with introducing new products (camera’s, affordable ADCs, etc.), and even the prototype products I have been testing over the years have been of very good quality and are all still working well after many years.
I’m very curious where our hobby will be heading in the future, but I’m pretty sure ZWO will be there!